
Breast Augmentation in San Francisco: Your Complete Guide to Implants, Recovery, and Results
Overview
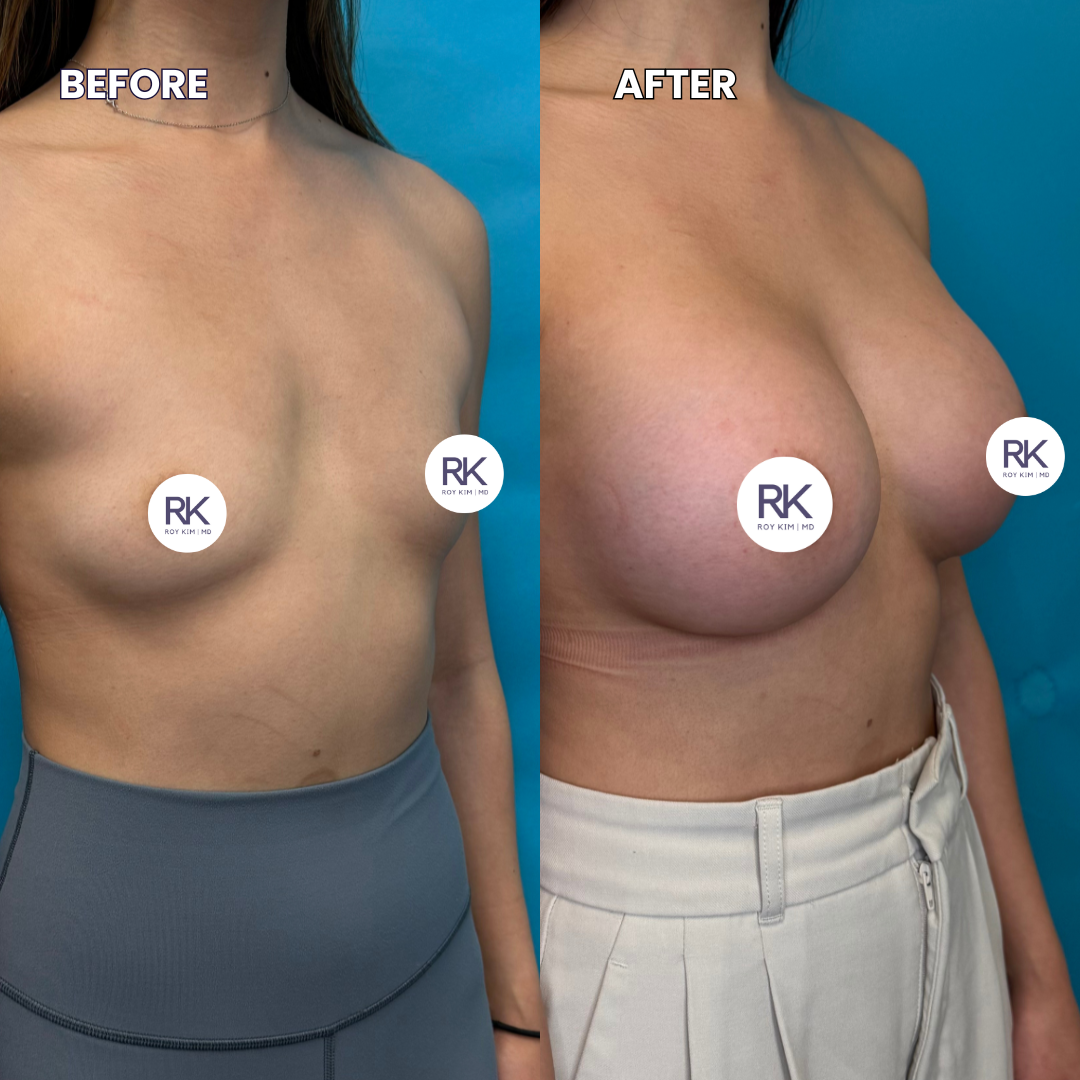
I've performed breast augmentations for over 25 years, and the procedure I do today looks nothing like what I was trained on. Subfascial placement, hybrid fat grafting, rapid recovery protocols: the technique has changed dramatically, and so have the results. But the one thing that hasn't changed is how much the details matter. The right implant, the right placement, the right surgeon. Get those wrong, and you're looking at a revision procedure. Get them right, and you simply have natural breasts and forget you ever had surgery.
Silicone gel implants from trusted manufacturers like Allergan, Mentor, and Motiva are the standard for natural look and feel
Implant placement, incision location, and size selection all affect your long-term outcome and should be discussed in detail during consultation
With my Rapid Recovery protocol, most patients return to office work in 3 to 4 days and light exercise in 1 to 2 weeks
Breast augmentation averages between $9,000 and $16,000 in the Bay Area depending on implant type and whether a lift is included
A board-certified plastic surgeon with high-volume breast surgery experience is non-negotiable
Who Is a Good Candidate for Breast Augmentation?
Most healthy women who want more volume or better symmetry are candidates for breast augmentation. But being a candidate and being ready are two different things.
I look for patients with realistic expectations. If someone comes to my San Francisco office asking for a subtle increase that fits their frame, we're usually on the same page. If someone brings in a photo of a completely different body type and says "make me look like this," we need a longer conversation.
Good candidates are generally:
In good overall health with no uncontrolled medical conditions
At a stable weight (significant weight changes after surgery affect results)
Done having children, or at least aware that pregnancy and breastfeeding will change the result
Non-smokers, or willing to quit for at least 4 to 6 weeks before and after surgery
Age matters less than health. I've done augmentations on patients in their 20s and patients in their 60s. The tissue quality and your goals drive the plan, not the number.
One thing I tell every patient: augmentation adds volume, but it doesn't fix position. If your breasts have lost their natural shape over time, from pregnancy, breastfeeding, weight changes, or gravity, volume alone won't restore where things used to sit. When the breast has settled lower on the chest or the nipple points downward (what we call ptosis), you'll need a breast lift in addition to implants, or sometimes a lift alone. There's nothing wrong with it, and it's one of the most common things I see in consultation. I'd rather be upfront about it so we plan the right procedure from the start. [LINK: Breast Lift Article]
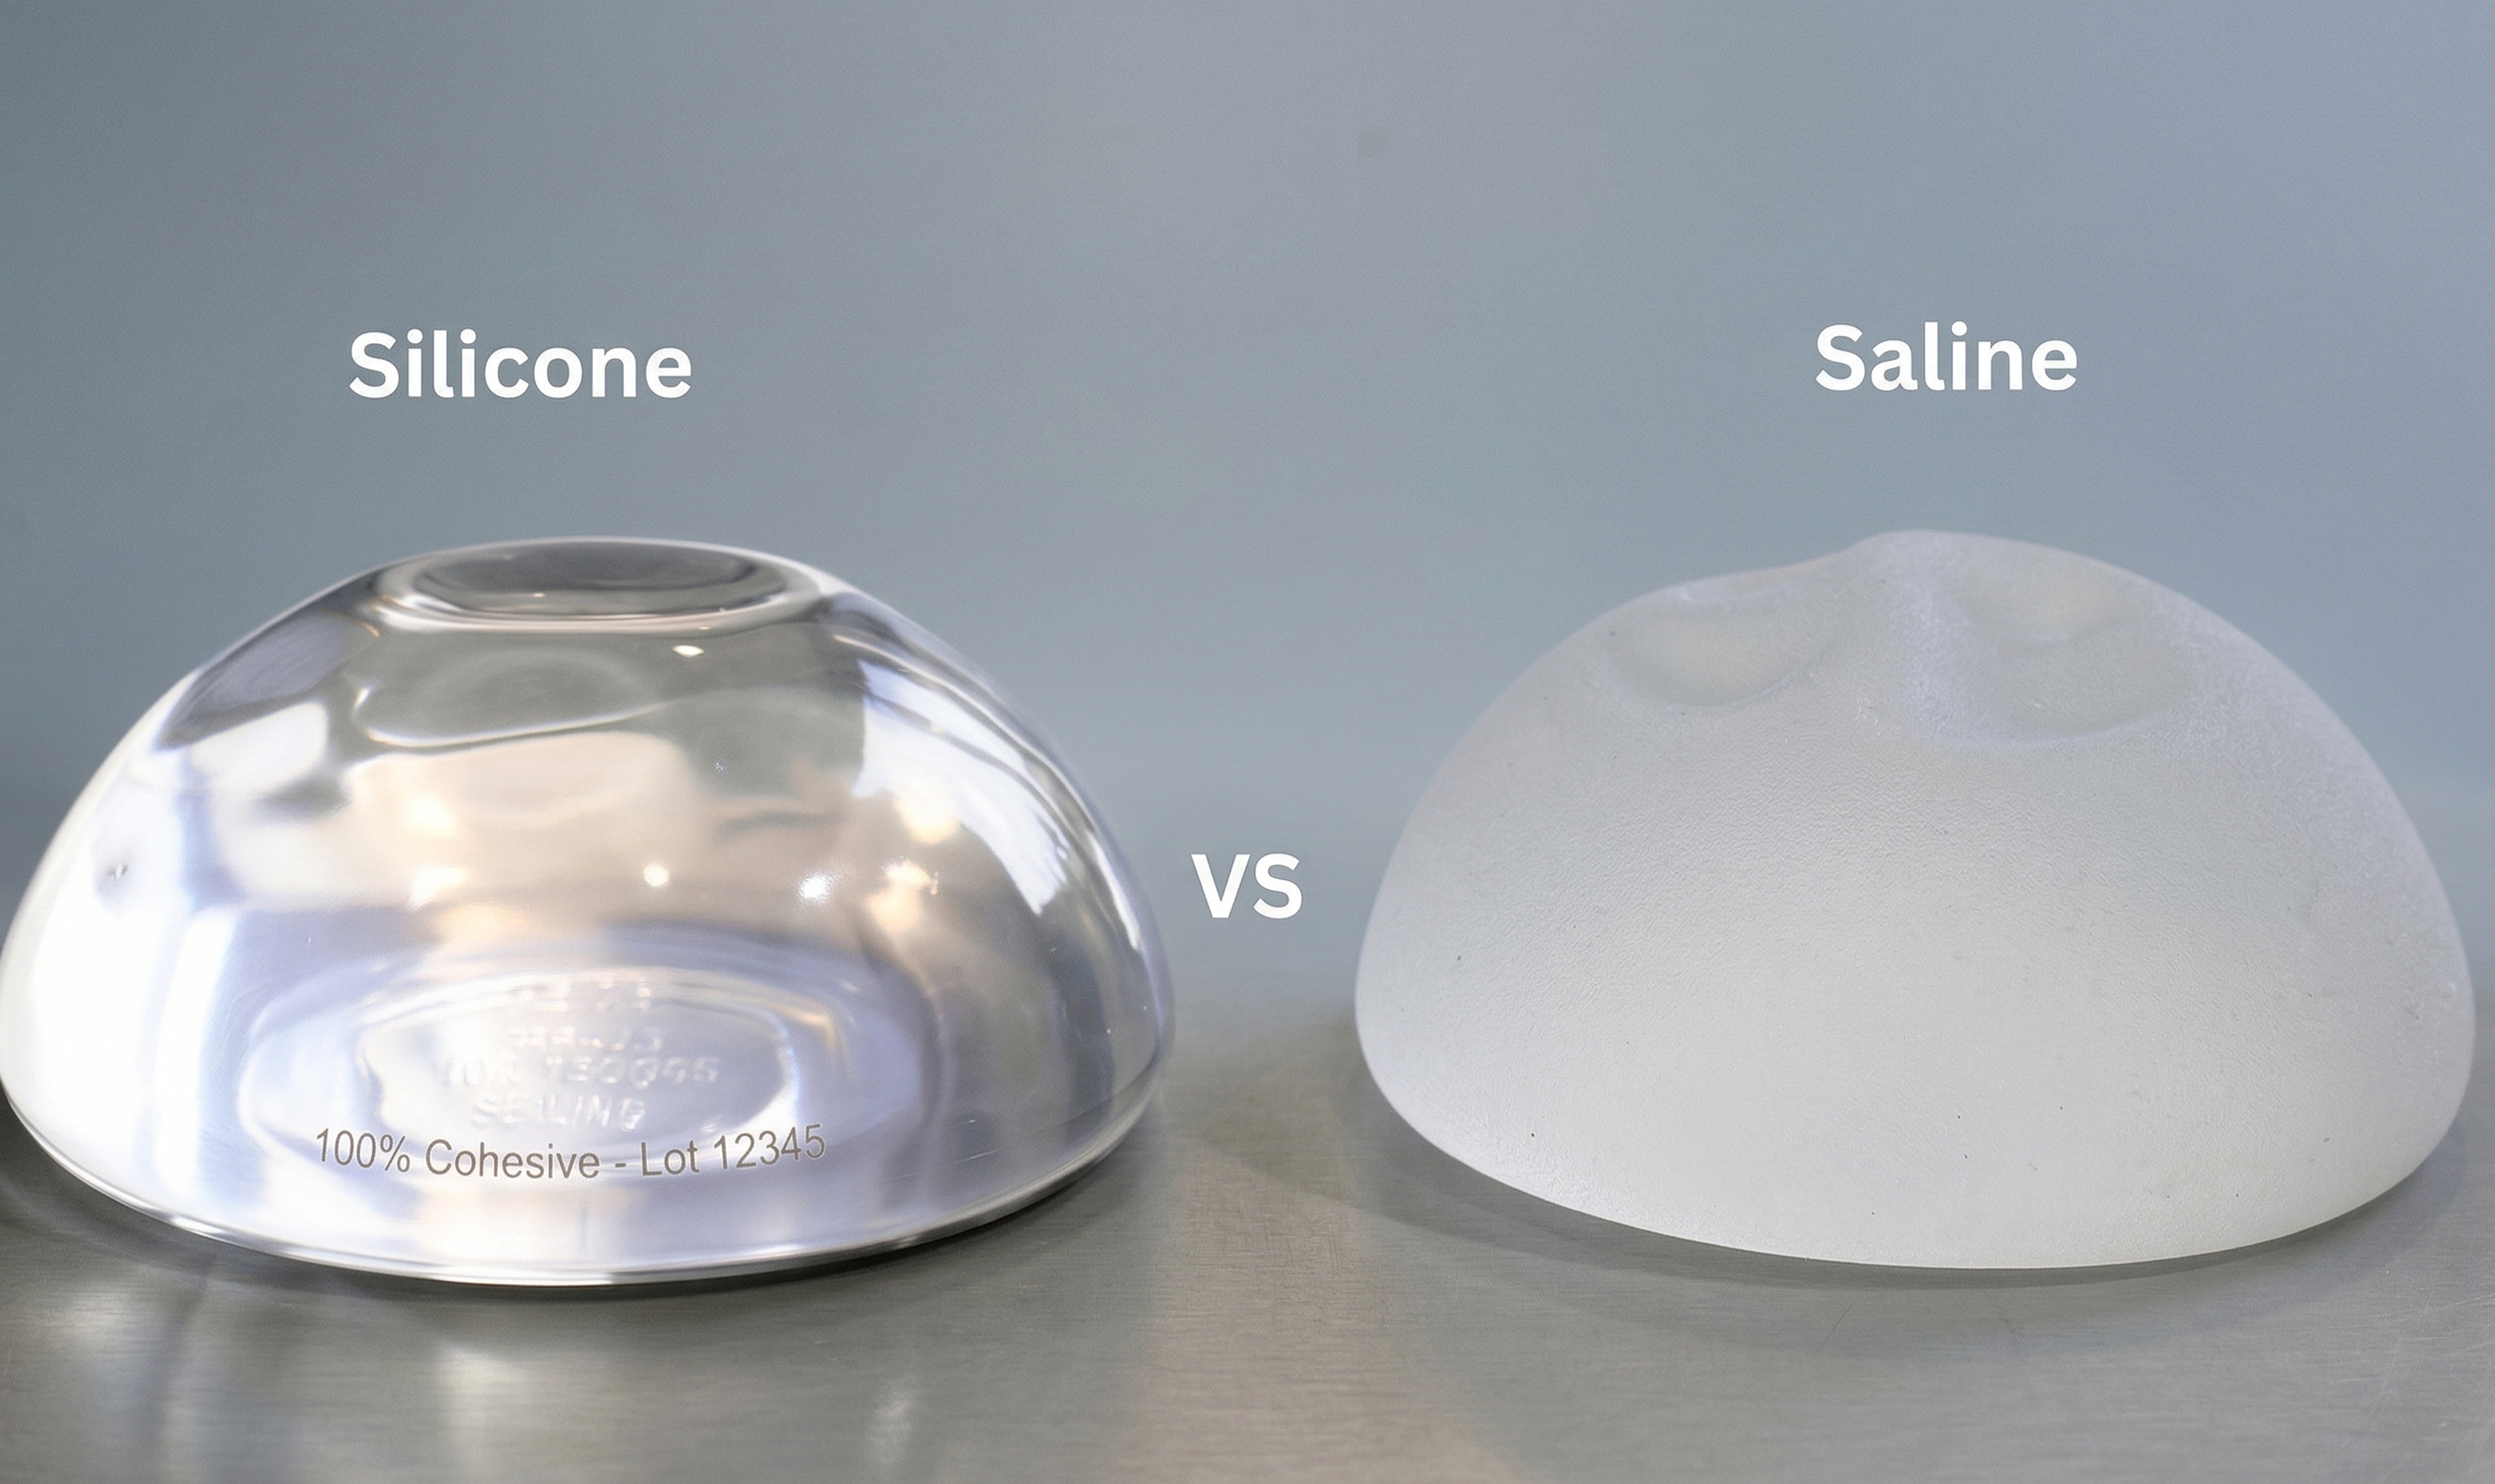
Silicone vs. Saline: Why the Implant Choice Matters More Than You Think
This decision shapes how your result looks, feels, and ages. Both have FDA approval and long safety records, but they perform differently.
Saline implants are filled with sterile saltwater after placement. The upside: if one ruptures, your body absorbs the saline harmlessly and the deflation is obvious, so you know right away. The downside: they feel firmer, they're more likely to show visible rippling (especially in thin patients), and they tend to look rounder and less natural.
Silicone gel implants are pre-filled with a cohesive gel that mimics the feel of natural breast tissue. For most patients, silicone provides a more natural look and feel. The catch is that silicone ruptures are harder to detect (called a "silent rupture"), which is why the FDA recommends periodic MRI or ultrasound screening.
In my practice, the majority of patients choose silicone. I had a patient last year, a second-grade teacher from Alameda, who came in convinced she wanted saline because she'd read about silicone safety concerns from the 1990s. After we talked through the data and she held both types in her hands, she switched to silicone. At her 3-month follow-up she told me, "I forget they're not mine." For thin patients with minimal natural breast tissue, silicone is almost always the better option because rippling is much less visible.
I work with implants from several trusted manufacturers, including Allergan, Mentor, and Motiva. Each has different product lines with their own strengths. During your consultation, I'll recommend the specific implant that's best suited to your anatomy and goals. [LINK: Motiva Breast Implants]
Implant Placement: Why I Switched to the Subfascial Approach
Where the implant sits makes a significant difference in how your augmentation looks, feels, and heals. For years, I placed most implants using a dual plane or submuscular approach, meaning the implant goes partially or fully beneath the pectoralis muscle. It worked well, and it's still a solid technique. But over the last several years, I've shifted the majority of my practice to subfascial placement, and I'm not going back.
Subfascial means the implant sits beneath the fascia, a thin but strong layer of connective tissue covering the pectoralis muscle, but on top of the muscle itself. Think of it as a natural pocket between the fascia and the muscle.
Why I prefer it:
The look and feel are more natural. The fascia provides coverage over the implant without the drawbacks of having the muscle press on it. Patients consistently tell me the result feels softer and moves more naturally with their body.
Animation deformity is gone. You know how some women's implants jump or distort when they flex their chest muscles? That's one of the most common complaints I hear from patients who had their augmentation done elsewhere. Subfascial eliminates it entirely.
Recovery is faster and more comfortable, which I'll get into in the recovery section below. Because we're not dissecting or stretching the pectoralis muscle, the first few days are significantly less painful. That's a big part of why my Rapid Recovery protocol works so well.
The fascia also gives reliable soft tissue coverage to prevent visible implant edges in most patients, without creating the problems that muscle placement does.
Subfascial placement isn't new, but it's gained traction among experienced breast surgeons over the past decade. It requires precise surgical technique because the fascial layer is thin and needs to be preserved intact during dissection. It's not a shortcut. Done well, it delivers the most natural-looking and natural-feeling results I've seen in 25 years of breast augmentation.
I still use submuscular or dual plane placement in specific cases where the anatomy calls for it, like patients with almost no breast tissue who need maximum coverage. But for the majority of women coming through my San Francisco and Alameda offices, subfascial is my preferred approach.
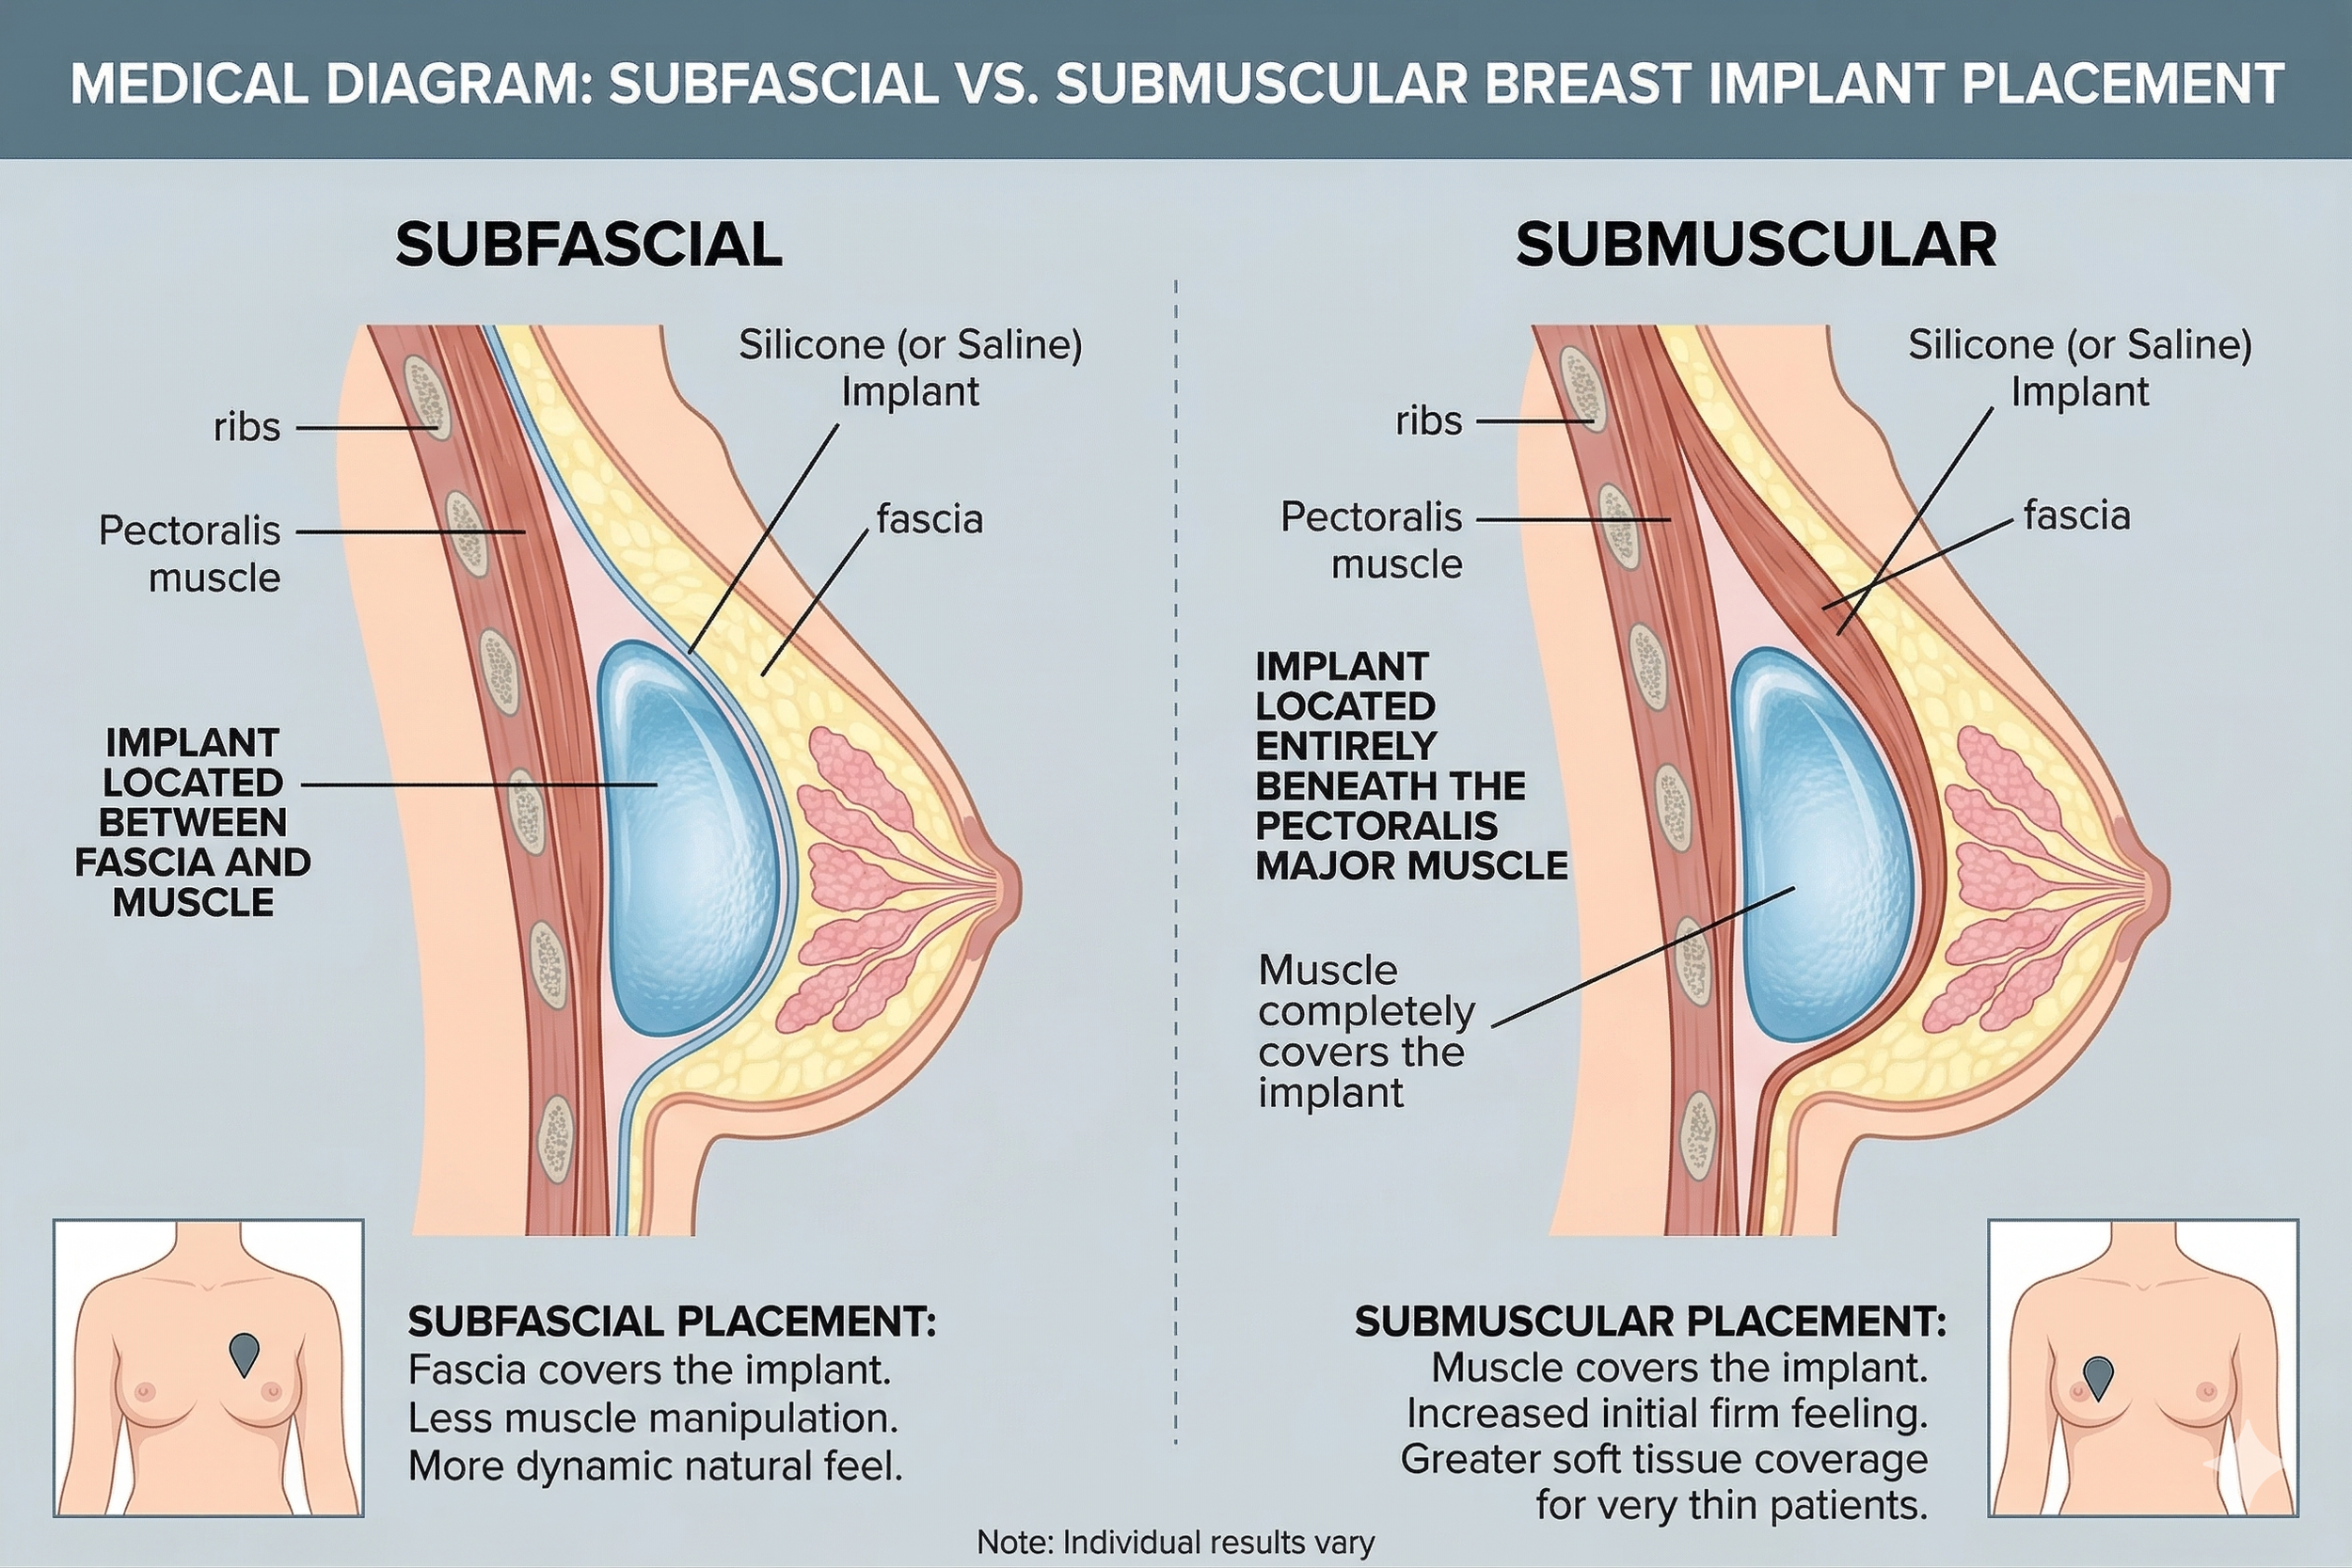
Diagram showing subfascial vs submuscular implant placement
Incision Options: Where the Incision Goes and How It Heals
Every breast augmentation requires an incision. The question is where, and how visible the resulting line will be once healed.
Inframammary fold (under the breast): This is my preferred approach for most patients. The incision sits in the natural crease under the breast, which hides well once healed. It gives me the best visibility and control during surgery, and it's the most versatile option for different implant types and sizes. The healed line fades and sits hidden in the fold. Most patients forget it's there after a year.
Periareolar (around the nipple): The incision follows the border of the areola. The resulting mark often heals well here because of the color transition, but this approach carries a slightly higher risk of changes in nipple sensation and sometimes makes breastfeeding more difficult.
Transaxillary (through the armpit): No mark on the breast at all, which appeals to some patients. The downside is limited surgical access, making precise pocket creation harder, especially for larger implants.
All three options come up during consultation, but for precision and long-term reliability, the inframammary approach is my go-to.
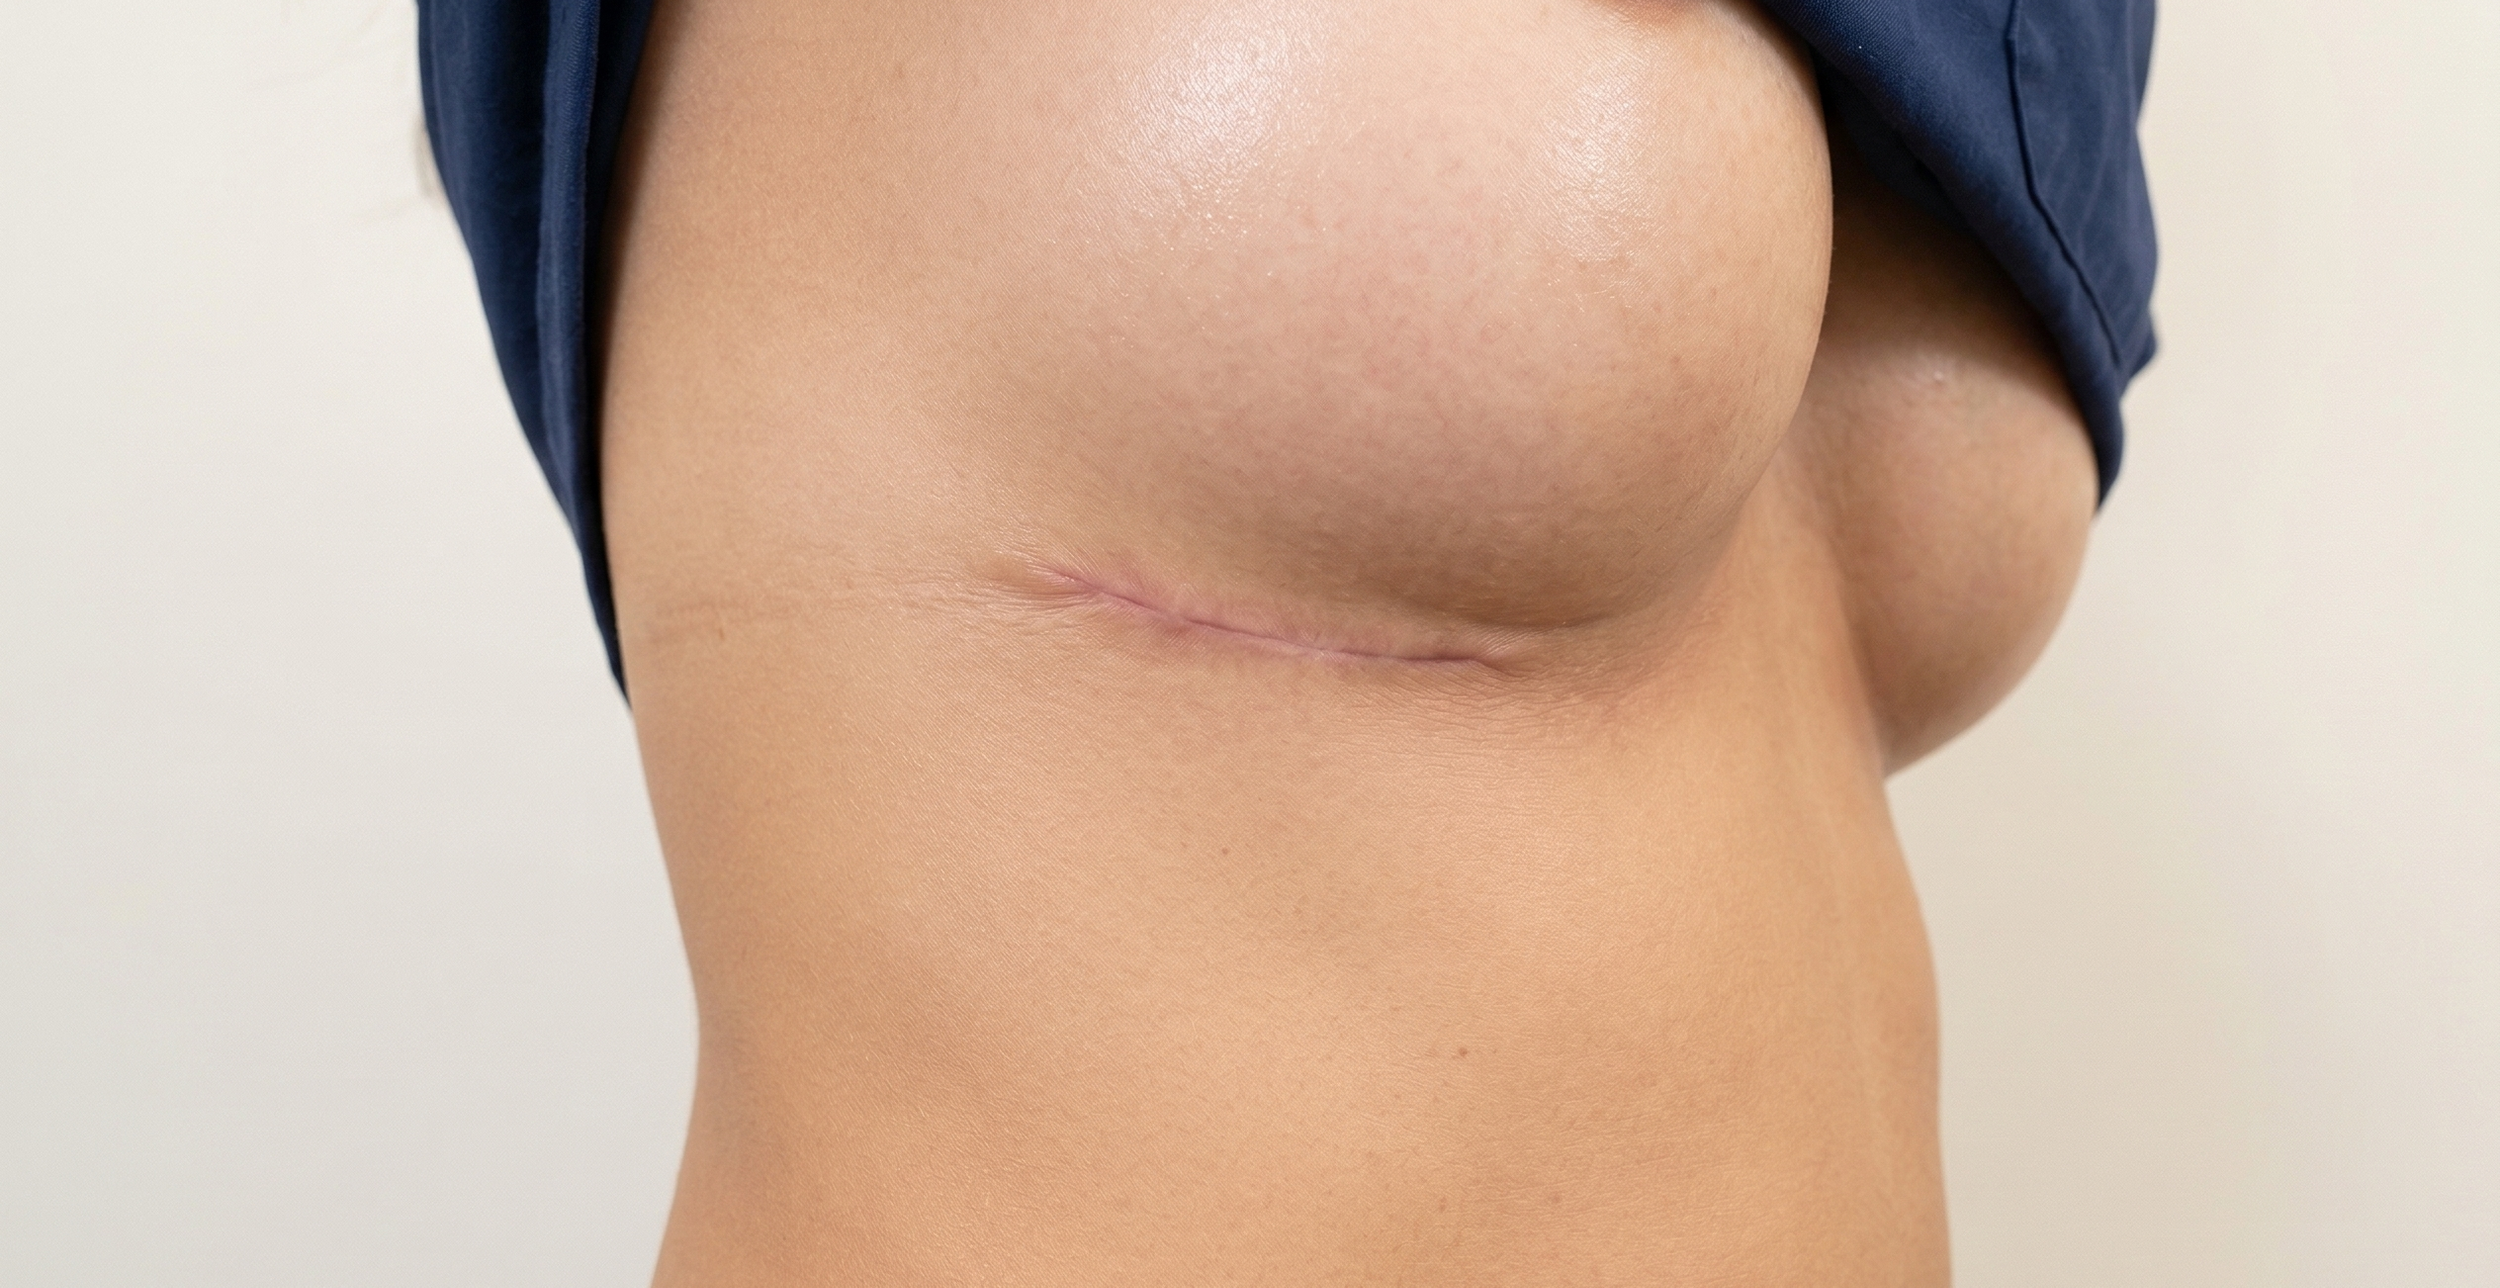
Healed inframammary fold incision at 6 months post-op
Size Selection: Why "I Want to Be a C Cup" Doesn't Mean What You Think
Cup size is the single most misunderstood concept in breast augmentation. A C cup at one bra brand is a D at another and a B at a third. It's not a standardized measurement, and it's not how I plan your surgery.
Instead, I focus on implant volume (measured in cubic centimeters) and how that volume interacts with your chest width, tissue thickness, and body proportions. During your consultation at my office on Sutter Street, we'll try different sizers so you see and feel the range of options.
A few things I've learned after doing this for 25 years:
Patients almost always wish they'd gone slightly bigger. I hear this at the 3-month follow-up more than anything else. That said, I won't place an implant that's too large for your tissue envelope. Overfilling leads to problems: visible edges, bottoming out, and faster tissue stretching.
Photos help. Bring pictures of results you like and results you don't. This tells me more about your aesthetic goals than a cup size ever will.
Your starting anatomy matters. Someone with a wide chest and existing breast tissue will look completely different with a 350cc implant than someone with a narrow chest and no tissue.
3D imaging helps too. It's not perfect, but it gives a much better sense of proportion than guessing.
The Consultation: What Happens and What to Ask
A good consultation is a two-way conversation, not a sales pitch. Here's what happens when you come to my office.
I start with your goals. What do you want to change? What do you want to keep? What results have you seen that you liked? Then I examine your anatomy: chest wall shape, breast tissue quality, nipple position, and symmetry. Most women have some degree of natural asymmetry, and it's worth talking about that upfront because implants don't erase it.
Based on our conversation and exam, I'll recommend specific implant options, placement, and incision approach. I'll explain why, and I'll be honest about limitations. If I think you need a lift in addition to implants, I'll tell you. If your expectations don't match what surgery delivers, I'll say so upfront.
Questions worth asking your surgeon:
How many breast augmentations do you perform per year?
What's your capsular contracture rate?
Do you have before-and-after photos of patients with a similar build to mine?
What implant brands do you use and why?
What happens if I need a revision?
Any surgeon who gets defensive about these questions is a red flag.
Recovery: What to Expect With My Rapid Recovery Protocol
One of the biggest concerns I hear from patients is downtime. Most of the women I see in San Francisco and the East Bay have demanding schedules and don't have weeks to spare. I developed my Rapid Recovery Breast Augmentation protocol specifically for this reason, and it's changed the recovery experience dramatically.
Days 1 to 2: The tightest, most uncomfortable period. Your chest will feel heavy and swollen. Prescribed pain medication helps, and you'll wear a surgical support bra. Most patients are up and walking around the house the same day. The subfascial approach helps here because we're not disrupting the chest muscle, so that initial soreness is less intense than with traditional submuscular placement.
Days 3 to 4: This is when most of my patients return to office work or remote work. Soreness replaces the initial tightness. You won't feel 100%, but you'll be functional. Driving is fine once you're off narcotic pain medication, which for most patients is day 2 or 3.
Weeks 1 to 2: Light exercise starts here. Walking is encouraged from day one, and by week 1 to 2, most patients are cleared for light weight training (lower body, light upper body, nothing heavy). The implants will still sit a bit high on the chest. Normal and temporary.
Weeks 3 to 4: Most exercise is back on the table. The implants begin to settle into their final position (a process called "drop and fluff"). You'll notice the shape changing week to week.
Months 3 to 6: This is when the final result comes together. The implants fully settle, swelling completely resolves, and the breast tissue softens around the implant.
One recent example: a software engineer from the South Bay was worried about taking time off during a product launch. She had her augmentation on a Thursday, worked from home Monday, and was back in the office by Wednesday. Not every patient bounces back that fast, but it's not unusual with my protocol.
Risks and What You Should Know
Every surgical procedure carries risk. Here's what I want you to understand before making your decision.
Capsular contracture is the most common complication. Your body forms scar tissue around every implant, which is normal. In some patients, that scar tissue tightens and squeezes the implant, making it feel firm or look distorted. Rates have dropped significantly with modern implants and techniques. With smooth-surface silicone implants and proper surgical technique, the rate in my practice is well under 5%.
Implant rupture or deflation happens eventually. Implants aren't lifetime devices. Most manufacturers warranty them for 10 years, but many last 15 to 20 years or longer. When silicone implants rupture, the gel usually stays contained within the capsule. Saline implants deflate noticeably. Either way, it means a replacement surgery.
Changes in nipple sensation affect some patients. Most experience temporary numbness or hypersensitivity that resolves within a few months. A small percentage have permanent changes. The periareolar incision carries the highest risk for this.
Other risks include infection (rare, under 1%), hematoma (bleeding that requires drainage), asymmetry, and implant malposition. I go over all of these during consultation. Patients who understand their risks tend to have better experiences because they know what to watch for and what's normal.
Cost and What Affects Your Price
Breast augmentation in San Francisco ranges from $9,000 to $16,000. The range depends on several factors:
Implant type: Silicone costs more than saline. Specialty implants like Motiva are at the higher end.
Surgeon's fee: This reflects experience, training, and demand. It's the area where you want to spend more, not less.
Facility and anesthesia fees: Accredited surgical facilities with board-certified anesthesiologists aren't cheap, and they shouldn't be. Safety costs money.
Additional procedures: Adding a breast lift, fat grafting (hybrid augmentation), or body contouring increases the total.
My fee covers the surgery, implants, anesthesia, facility, and all follow-up visits. When comparing quotes between practices, make sure you're looking at all-inclusive pricing so you're comparing apples to apples. Some offices quote a base number and add facility, anesthesia, and implant fees separately.
Insurance doesn't cover cosmetic breast augmentation. If you're seeking reconstruction after mastectomy, that's a different situation and is covered.
Breast Augmentation Combined With Other Procedures
Augmentation is frequently paired with other procedures, and combining them makes sense both for results and recovery.
Hybrid Breast Augmentation: Implants Plus Fat Grafting
This is, in my opinion, the best result you're going to get from breast augmentation. Hybrid breast augmentation combines a silicone implant with fat grafting, where I harvest fat from areas like the abdomen, flanks, or thighs and inject it around the implant to smooth transitions and add soft tissue coverage.
The implant provides the core volume and projection. The fat softens the edges, fills in contour irregularities, and makes the final result look and feel like it was always there. For patients with thinner skin or minimal natural breast tissue, that fat layer makes a noticeable difference.
Where it falls short: it adds time to the procedure and increases the cost modestly. Not every patient needs it or wants it. But for those pursuing the most natural-looking result possible, hybrid is what I recommend first. [LINK: Hybrid Breast Augmentation Article]
Augmentation With a Breast Lift
If your breasts have lost their natural position over time, adding an implant alone won't correct where things sit. A lift (mastopexy) repositions the nipple and removes excess skin, while the implant restores volume. Together, they create a result that neither procedure achieves alone. This is one of the most common combinations I perform, and it's nothing to feel self-conscious about. Gravity, pregnancy, and time affect everyone differently. [LINK: Breast Lift Article]
Mommy Makeover
Breast augmentation paired with a tummy tuck (and sometimes liposuction) addresses the changes that pregnancy and breastfeeding leave behind. Doing these together means one anesthesia session and one recovery period instead of two. Many of my East Bay and South Bay patients combine these to minimize overall downtime. [LINK: Mommy Makeover Article]
Myths About Breast Augmentation
Myth: Implants need to be replaced every 10 years.
Not true. There's no expiration date. The 10-year mark comes from manufacturer warranty timelines, not a medical requirement. If your implants look good, feel good, and imaging shows no issues, there's no reason to replace them on a schedule. Many patients go 15 to 20 years or more without needing a revision.
Myth: You won't be able to breastfeed after augmentation.
Most women with implants breastfeed without issues. The implant sits behind the breast tissue (or behind the fascia and the tissue), so the milk ducts and glands are preserved. The periareolar incision has the highest (though still low) risk of affecting breastfeeding because it passes through more breast tissue.
Myth: Bigger implants always look fake.
Size alone doesn't make a result look artificial. Proportion is what matters. An implant that's proportional to your chest width and frame looks natural regardless of whether it's 300cc or 450cc. What looks fake is an implant that's too wide for the chest wall, placed too high, or sitting on top of minimal tissue with no coverage. This is one reason I'm a fan of hybrid augmentation, where a layer of fat grafting softens everything.
Myth: Recovery takes weeks off work.
With my Rapid Recovery protocol and subfascial placement, most of my patients are back at a desk in 3 to 4 days. Light exercise resumes in 1 to 2 weeks. The days of being out of commission for two weeks are over for most patients.
Frequently Asked Questions
-
About 1 to 1.5 hours for a straightforward augmentation. A hybrid augmentation with fat grafting adds 30 to 45 minutes. If we're combining it with a lift or other procedure, plan for 2 to 3 hours total. You'll be under general anesthesia the entire time with a board-certified anesthesiologist monitoring you.
-
With modern silicone implants, subfascial placement, and proper surgical planning, the results should look and feel natural. The key factors are choosing the right implant size for your frame, using the right placement technique, and working with a surgeon who prioritizes proportion over volume. Adding fat grafting (hybrid augmentation) makes the result even more natural. I tell patients that the best augmentation is one nobody notices unless you tell them.
-
Saline is filled with saltwater and feels firmer. Silicone is filled with cohesive gel and feels more like natural breast tissue. Silicone implants also have lower rippling rates, which is especially important for lean patients. Saline's advantage is that a rupture is immediately obvious. Both are safe, FDA-approved options with decades of clinical data.
-
Forget cup sizes. During your consultation, we'll use sizers and 3D imaging to help you visualize different volumes on your body. I take measurements of your chest width, tissue thickness, and skin elasticity to determine the range of implants that will work well with your anatomy. Most importantly, bring reference photos of results you like.
-
There's no set lifespan. Many patients keep their implants for 15 to 20 years or longer without issues. Manufacturer warranties cover 10 years. I recommend periodic imaging (MRI or ultrasound) to check for silent ruptures in silicone implants, especially after the 10-year mark. You'll only need replacement if there's a problem or if you want to change size.
-
Subfascial placement positions the implant beneath the fascia (a layer of connective tissue covering the chest muscle) but above the muscle itself. It gives soft tissue coverage without the animation deformity and recovery pain associated with submuscular placement. The result looks and feels more natural, and recovery is faster. It's my preferred technique for the majority of patients.
-
With an inframammary fold incision (my preferred approach), the line sits hidden in the natural crease under the breast. It fades significantly over the first year and is not visible in a bra or bathing suit. The periareolar approach leaves a mark at the areola border, which also heals well for most patients. How well any incision heals depends on your skin type, genetics, and aftercare.
-
Walking: same day
Office work: day 3 to 4
Light weights and cardio: week 1 to 2
Full exercise (including upper body): week 3 to 4 for most patients
Heavy lifting and CrossFit: week 4 to 6 with gradual progression
I give specific clearance at each follow-up visit. Patients who push too hard too fast risk implant displacement and increased swelling. It's not worth it.
Summary
Breast augmentation in San Francisco has come a long way from the one-size-fits-all approaches of 20 years ago. Modern implant technology from manufacturers like Allergan, Mentor, and Motiva, the shift to subfascial placement, hybrid augmentation with fat grafting, and my Rapid Recovery protocol have made this one of the most reliable and satisfying procedures I perform. The decision comes down to choosing the right implant and technique for your anatomy, understanding the recovery process, and working with a surgeon you trust to be honest about what's achievable. Getting it right the first time is always the goal.
Ready to Talk About Your Options?
If you're considering breast augmentation, the best next step is a one-on-one consultation where I evaluate your anatomy, discuss your goals, and walk you through the options that make sense for your body.
Call 415-362-1846 or visit our office at 450 Sutter Street, Suite 1440, San Francisco. I also see patients at our Alameda location at 1403 Park Street for East Bay consultations.
Follow and Connect with me on my social media!